Are you tired of leaky sink drain pipes? Or do you find plumbing repairs too complex? Many homeowners face these issues when installing sink drain assemblies in their kitchen and bathroom.
Improper installation can cause water damage and lead to costly repairs. It can also result in leaks that are frustrating and hard to fix.
This guide will show you how to install sink drain pipe with ease. We’ll break it down into simple steps. Even if you’re new to DIY projects, you’ll be able to handle kitchen and bathroom sink drainage like a pro.
Read also: How to Change a Sink Drain

Essential Tools and Materials for Sink Drain Installation
Getting ready for an under sink plumbing job needs careful planning and the right tools. I’ll show you how to pick the best tools and materials for a smooth drain installation.
Before starting, it’s key to gather the right supplies. Your toolkit can turn a tough job into a professional success.
Required Tools for the Job
- Slip joint pliers for precise pipe adjustments
- Hacksaw for cutting pipes accurately
- Laser level to ensure perfect alignment
- Adjustable wrench
- Tape measure
Necessary Materials and Parts
- Trap kits with complete assembly components
- Sink drain push-pop assembly
- Trap adapter
- Silicone sealant tube
- ABS cement
- Replacement drain pipes
Safety Equipment Checklist
- Protective safety glasses
- Work gloves
- Disposable dust mask
- Knee pads for comfort
Quality tools and safety gear make your plumbing job better and safer. Being ready before you start avoids delays during the installation.
Understanding Different Types of Sink Drain Assemblies
Knowing the different sink drain assembly types can save you time and frustration. I’ve worked with various sink designs. Understanding their unique characteristics is key for a successful installation.
- Pop-up Drains: Commonly found in bathroom sinks, these feature a mechanical stopper mechanism that allows you to block or open water flow
- Basket Strainers: Typical in kitchen sinks, these have a removable basket designed to catch food particles and prevent clogging
- Grid Strainers: Popular in modern sink designs, these offer a sleek, flat profile with multiple small drainage holes
Each sink drain assembly requires specific installation techniques. The pop-up drain, for instance, involves more complex sink drain pipe installation due to its internal lever mechanism. Kitchen sink basket strainers need careful sealing to prevent leaks.
Professional plumbers recommend selecting a drain assembly that matches your sink’s design and your specific drainage needs. Choosing the right drain assembly ensures optimal performance and minimizes future maintenance issues.
Preparing Your Workspace for Drain Pipe Installation
Getting ready for under sink plumbing work is key. A tidy workspace makes the job easier and faster. Let’s go over the important steps to get your area ready for a successful project.
Clearing the Under-Sink Area
First, clear the space under the sink completely. This makes a clean area to work in and keeps your stuff safe. Take out cleaning supplies, extra toiletries, and anything else to have room to move.
Initial Measurements
Getting the right measurements is vital for under sink plumbing. I always take precise measurements of:
- Distance from sink drain hole to wall pipe
- Height differences between existing pipes
- Available space for new drain pipe installation
Safety Preparations
Always put safety first when installing drain pipes. Here are some safety tips:
- Lay down a protective cloth or towel to catch water and debris
- Ensure good lighting in your work area
- Wear protective gloves and safety glasses
- Keep a bucket nearby for any water
| Preparation Step | Purpose |
|---|---|
| Clear workspace | Prevent damage to stored items |
| Take measurements | Ensure proper pipe fitting |
| Safety gear | Protect yourself during installation |
By following these steps, you’ll be ready for a smooth and worry-free drain pipe installation project.
How to Install Sink Drain Pipe: Step-by-Step Guide
Installing a sink drain pipe might seem hard, but it’s doable with the right steps. I’ll guide you through the process to ensure a professional and leak-free finish.
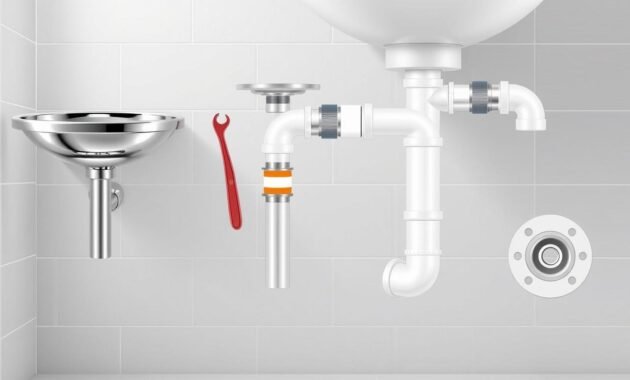
First, gather all the tools and materials you need. It’s a good idea to lay them out and double-check they’re within reach.
- Apply a thin bead of plumber’s silicone sealant around the sink’s drain opening
- Insert the drain body into the sink’s pre-drilled hole
- Secure the drain assembly from underneath using a mounting nut
- Tighten the connections using an adjustable wrench
- Align the drain pipe with the sink’s tailpiece
When you start, focus on a tight seal between the drain body and the sink. Be careful when tightening the mounting nut. Avoid over-tightening to prevent damage.
Alignment is key for a successful installation. Make sure all connections are straight and level. Use pipe joint compound or Teflon tape on threaded parts to seal leaks.
Don’t forget to check the pipe connections. They should be snug but not too tight. A gentle quarter-turn after hand-tightening usually seals the deal.
Installing the Pop-up Drain Assembly
Installing a sink drain assembly needs precision and attention to detail. The pop-up drain mechanism is key for smooth drainage and function in your bathroom sink. I’ll show you how to install this important part of your sink drain pipe fitting.
Before starting, make sure you have all the tools and materials you need. You’ll require a few essential items for a successful installation:
- Silicone sealant
- Plumber’s putty
- Adjustable wrench
- Clean cloth or rag
- Pop-up drain assembly kit
Preparing the Drain Opening
Clean the sink’s drain opening well to get a good seal. Remove any old putty or debris from before. Use a clean cloth to wipe the surface, making it smooth for your new drain pipe fitting.
Applying Silicone Sealant
Put a thin, continuous bead of silicone sealant around the drain opening. This step is vital for a watertight seal between the sink and the drain assembly. Use a thin layer to avoid leaks in the future.
Securing Drain Components
Place the pop-up drain assembly into the sink opening carefully. From underneath, use the mounting hardware to secure it. Tighten the parts slowly and evenly, checking alignment. Avoid over-tightening to prevent damage or leaks.
- Align the drain body carefully
- Insert mounting nuts hand-tight
- Use wrench to give final quarter turn
- Wipe away excess sealant
By following these steps, you’ll have a reliable pop-up drain assembly. It will add functionality and a professional look to your sink.
P-Trap Installation and Connection Methods
Installing a p-trap is key to a good drain pipe connection for your sink. I’ll guide you through the p-trap installation process. This ensures your sink drains well and keeps sewer gases out.
Read also: How to Install Sink Drain Pipe on the Kitchen
The p-trap does two main things. It makes a water seal to block bad smells and keeps sewer gases out. When setting up drain pipe connections, measure and align the p-trap carefully for the best results.
- Select the correct p-trap size matching your sink’s drain pipe diameter
- Ensure proper slope for efficient water drainage
- Use slip joint connections for flexible fitting
- Apply plumber’s tape on threaded connections to prevent leaks
When installing the p-trap, focus on aligning the sink’s tailpiece with the wall pipe. You might need to trim pipes for a perfect fit. Adjustable p-traps are helpful for tricky spaces.
For successful drain pipe connections, check for tight seals and avoid over-tightening. This can damage fittings. Use the right washers and gaskets to prevent leaks.
Proper Alignment and Securing Drain Pipe Connections
When fixing sink plumbing, getting the drain pipe connections right is key. It stops leaks and keeps the plumbing system running smoothly. Proper alignment and secure connections prevent water damage and expensive fixes later.
I’ll show you how to make sure your drain pipe connections are strong and leak-free. It’s all about being careful and precise with each connection.
Checking Pipe Alignment
Before you finish your drain pipe connections, check alignment carefully. Look for these important signs:
- Pipes should be straight and parallel
- No visible gaps between connection points
- Threads should line up smoothly
- No unusual bending or twisting of pipes
Mastering Tightening Techniques
Fixing sink plumbing needs a gentle touch when tightening connections. Start by hand-tightening to ensure threads engage right. Then, use slip joint pliers with these tips:
- Wrap pipe connections with a soft cloth to prevent scratching
- Apply gentle, even pressure
- Tighten until snug, but avoid over-tightening
- Check for smooth rotation and tight seal
The aim is a secure connection that stops leaks without harming your pipes or fittings. Take your time, and you’ll have a reliable drain system that works great.
Read also: How to Stop Brass Fittings From Leaking
Troubleshooting Common Installation Issues
When installing sink drain pipes, unexpected problems can arise. I’ve seen many sink plumbing repair situations that need careful diagnosis and exact solutions.
Here are the most common issues you might encounter during installation:
- Water leaks around pipe connections
- Misaligned drain pipes
- Inadequate drainage performance
- Loose pipe fittings
To find leaks, I suggest a detailed check. Look for moisture or water drops at each connection. Small leaks can often be fixed by adjusting the connections or using plumber’s tape.
When dealing with pipe installation problems, focus on alignment. Misaligned pipes can lead to drainage issues. Use a level to ensure the pipes are correctly sloped and positioned. Even small adjustments can greatly improve water flow and prevent blockages.
If problems persist, try these troubleshooting steps:
- Check all pipe connections for tightness
- Make sure the pipe angle and slope are right
- Look for any blockages
- Check the seal around connections
At times, you might need a professional plumber. If DIY repairs seem too hard or complex, don’t hesitate to call a licensed plumber. They can save you time and prevent water damage.
Testing Your Newly Installed Drain System
After fixing your sink and installing the drain, it’s important to test it well. This ensures everything works right. A good test can prevent water damage and save you money on repairs later.
I’ll show you how to check if your drain system is working right. We’ll find any problems early on.
Leak Detection Techniques
Finding leaks needs a careful look. Here are the best ways to do it:
- Visual inspection of all pipe connections
- Paper towel test around pipe joints
- Dry pipe surface checking
Water Flow Performance Testing
To make sure your drain pipes are installed right, do these tests:
- Run water at different speeds
- Check drainage consistency
- Listen for unusual gurgling sounds
| Test Type | Purpose | Indicator of Success |
|---|---|---|
| Slow Trickle Test | Check gradual water drainage | Smooth, consistent water flow |
| Full Sink Test | Evaluate system under high volume | Complete drainage within 30 seconds |
| Pressure Test | Detect possible leaks | No water seepage around connections |
A good sink repair means your drain system can handle lots of water. Take your time to test it well. This way, you can fix any problems right away.
Maintenance Tips for Long-lasting Drain Performance
To keep your sink drain in great shape, you need to take care of it regularly. I’ll share some easy tips to help you keep your drain system working well. This will also help avoid expensive repairs.
Regular maintenance can make your drain last longer. Here are some important steps to follow:
- Use drain catches to prevent debris from entering pipes
- Clean drains weekly with gentle, non-corrosive solutions
- Inspect connections for possible leaks every month
- Avoid pouring grease or harsh chemicals down the drain
Stopping clogs is key to avoiding plumbing problems. Use tools like a drain snake or plunger for small blockages. This way, you can avoid bigger issues.
| Maintenance Task | Frequency | Benefits |
|---|---|---|
| Drain Catch Cleaning | Weekly | Prevents debris buildup |
| Pipe Connection Inspection | Monthly | Catches early signs of leaks |
| Deep Drain Cleaning | Quarterly | Removes possible blockages |
By following these maintenance tips, you’ll protect your drain and avoid costly repairs. Regular care keeps your sink’s drainage system efficient and reliable.
Conclusion
Installing a sink drain pipe might seem tough at first. But with the right tools and knowledge, you can do it. I’ve shown you how to install a sink drain pipe system, from start to finish.
Practice is key. Every installation you do will make you more confident and skilled. This guide has detailed steps, but know your limits. If something seems too hard, get a professional plumber.
Installing and maintaining your sink drain system right is important. It keeps your system working well for a long time. By following our tips, you’ll save money and learn more about home improvement.
Your success comes from being patient, paying attention to details, and wanting to learn. Now, you’re ready to install sink drain pipes with confidence and skill.
