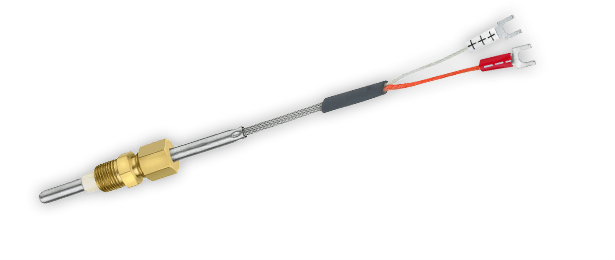
A thermopile is an electronic device that converts heat energy into electrical energy. It comprises multiple thermocouples arranged in series or parallel. These thermocouples measure the temperature differential from the junction area where the thermocouple’s output voltage is recorded. Understanding how to troubleshoot thermopile issues, especially in water heaters, can save you from a lot of inconvenience.
Understanding the Thermopile
In water heaters, the pilot light heats the thermopile and thermocouple, producing a small millivolt of electricity that moves to the gas control valve. If the pilot light goes out, the thermopile cannot generate enough power, causing the gas control valve to shut down. This function is restored to normal once the pilot light is turned on.
Older water heater models may require more adjustments and patience to light the pilot, while newer models often have sealed combustion areas and use special devices to reignite the pilot.
Honeywell Water Heater Issues
Consider the case of a homeowner who installed a new Honeywell water heater. Despite following the installation steps correctly, the pilot light repeatedly went out, displaying a “thermopile voltage low” error. After several troubleshooting attempts and contacting both Rheem and Home Depot without resolution, the homeowner returned the unit and replaced it with the same model.
Fortunately, the new unit worked flawlessly, highlighting the importance of understanding thermopile functionality and the potential variability in product quality.
What Does Thermopile Voltage Low Mean?
A thermopile voltage low error indicates that the thermocouples cannot generate enough current to power the gas control valve. This issue prevents the water heater from providing hot water. The error often manifests through specific status light codes on the water heater. For example, a blinking red light might indicate this voltage issue.
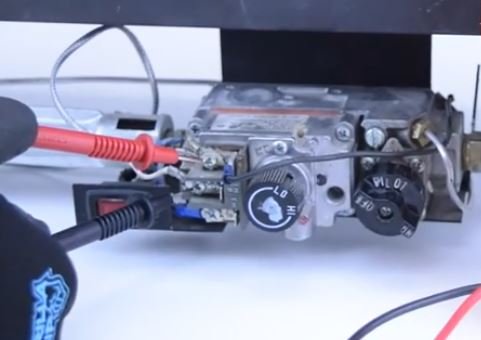
Testing the Thermopile
Testing the thermopile can determine if it needs replacement. Here are the steps for both open-circuit and closed-circuit tests:
Open Circuit Thermopile Testing
- Turn on the Pilot: Follow the lighting instructions on your water heater. Turn on the pilot and let it operate for about three minutes.
- Hold the Pilot Button: Spin the gas control knob to the pilot position, push, and hold it during testing.
- Use a Multimeter: Set the multimeter to measure millivolts. Place one lead on the left side of the wire harness and the second lead on the right side. A reading of 300 millivolts or higher indicates a good thermopile. Below 300 millivolts means it needs replacement.
Closed Circuit Thermopile Testing
- Disconnect Pilot Cables: Release the red and white pilot cables from the gas control.
- Use a Multimeter: Connect one lead to the red wire and the second lead to the white wire. Follow the lighting instructions again, turning on the pilot and letting it run for three minutes.
- Read the Output: If the reading is more than 400 millivolts, the thermopile is in good condition. Below 400 millivolts indicates a poor thermopile.
In-Depth Insights on Thermopiles
Thermopiles are essentially multiple thermocouples combined to generate sufficient current for the power circuit board in electronic gas control systems. This configuration is more complex than a single thermocouple, which only produces enough current for a mechanical gas valve.
Authoritative Advice
Based on 20 years of experience in home maintenance and HVAC systems, I recommend the following best practices for dealing with thermopile voltage issues:
- Regular Maintenance: Schedule periodic checks for your water heater to ensure all components, including the thermopile, function correctly.
- Professional Help: If you are uncomfortable performing tests or replacements yourself, consult a professional. Incorrect handling can lead to safety hazards.
Real-Life Case Study: Addressing Low Thermopile Voltage
A customer reported that their water heater frequently showed a “thermopile voltage low” error. Despite following troubleshooting steps, the issue persisted. Upon professional inspection, it was found that the thermopile was not faulty.
Instead, the problem was due to a draft from a nearby open window extinguishing the pilot light. This case underscores the importance of considering environmental factors during troubleshooting.
Tables for Quick Reference
Thermopile Voltage Readings
| Voltage (millivolts) | Condition | Action Needed |
|---|---|---|
| 650-850 | Excellent | No action needed |
| 400-650 | Good | Monitor regularly |
| 300-400 | Fair | Consider replacement |
| Below 300 | Poor | Replace thermopile |
Troubleshooting Steps
| Step | Description |
|---|---|
| 1. Turn off gas supply | Ensure safety before starting any maintenance. |
| 2. Disconnect wires | Carefully remove wires connected to the thermopile and ignitor. |
| 3. Remove manifold door | Gain access to the pilot assembly and thermopile wire. |
| 4. Test thermopile | Use a multimeter to check voltage output. |
| 5. Replace if necessary | Install a new thermopile if readings are below acceptable levels. |
| 6. Reassemble components | Follow the reverse order to reconnect and secure all parts. |
| 7. Test for functionality | Ensure the pilot light stays lit and the water heater operates correctly. |
As an example like the video below about Water Heater Pilot Light & Thermopile Troubleshooting :
Conclusion
Dealing with thermopile voltage issues can be challenging, but with the right knowledge and tools, you can effectively troubleshoot and resolve these problems. Always ensure safety first, and do not hesitate to seek professional help if needed. Regular maintenance and understanding the intricacies of your water heater will help ensure its longevity and optimal performance.


